
Documentation
Everything you can build in the engine: scenes and choices, characters and art, branching logic, the dialogue box and title screen, and Muse, your AI collaborator. Examples are drawn from "The Question", the classic visual-novel demo.
Getting started
What the engine is, the words we use, and your first playable story.
Overview & core concepts
VNovels is a browser studio for branching, interactive stories, the kind you build in Ren'Py, but with no install and no code. You write the words, generate the art, and play the result in the same editor.
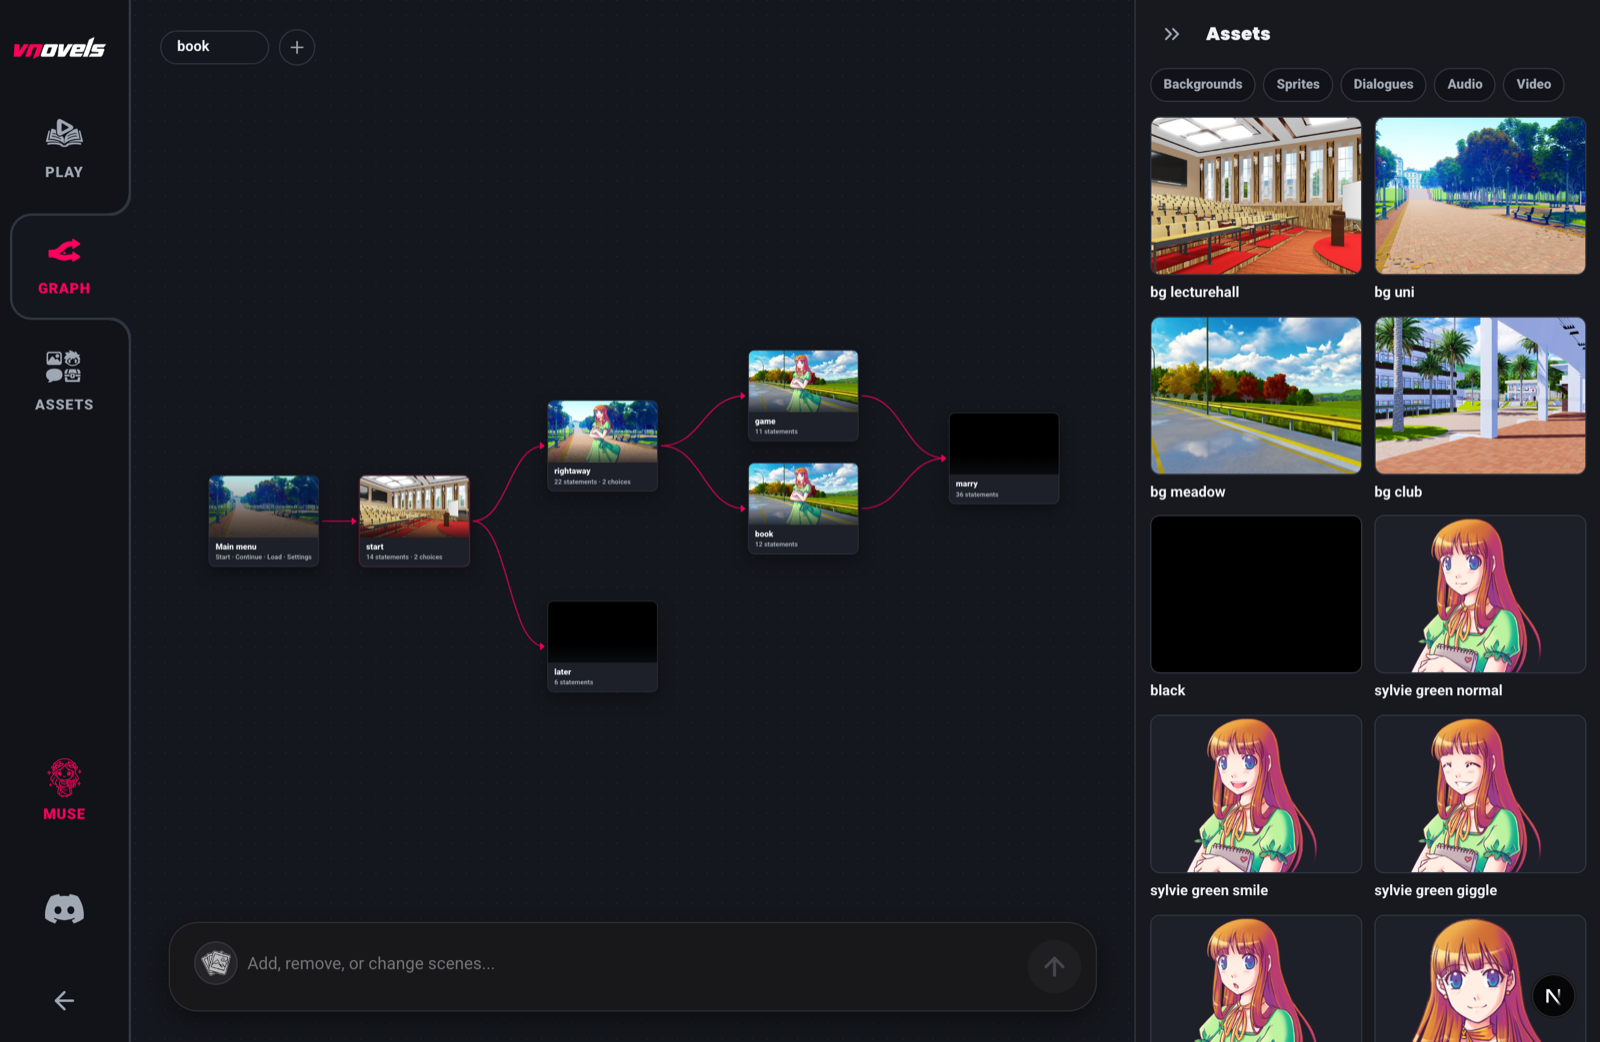
Every story you make is a project. You open a project in the Engine and work in one of three views, switched from the left rail (which also carries a Muse button for the AI assistant):
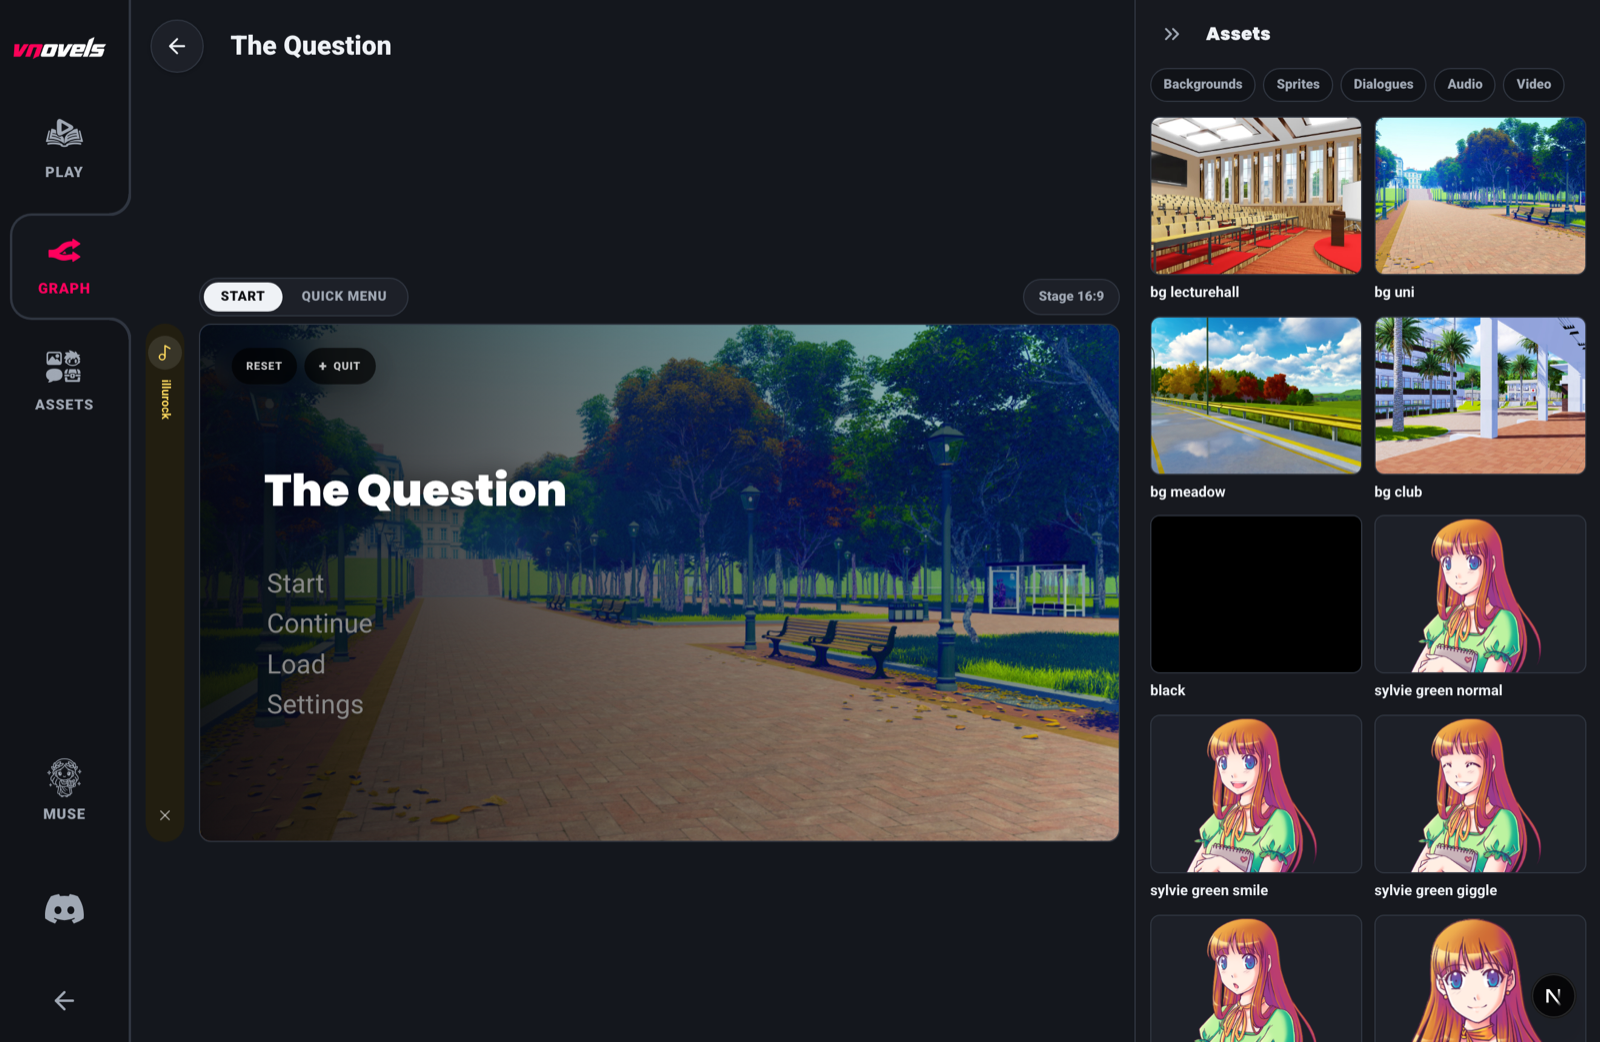
- Play. Read and test your story exactly as a player will, advancing line by line and taking choices.
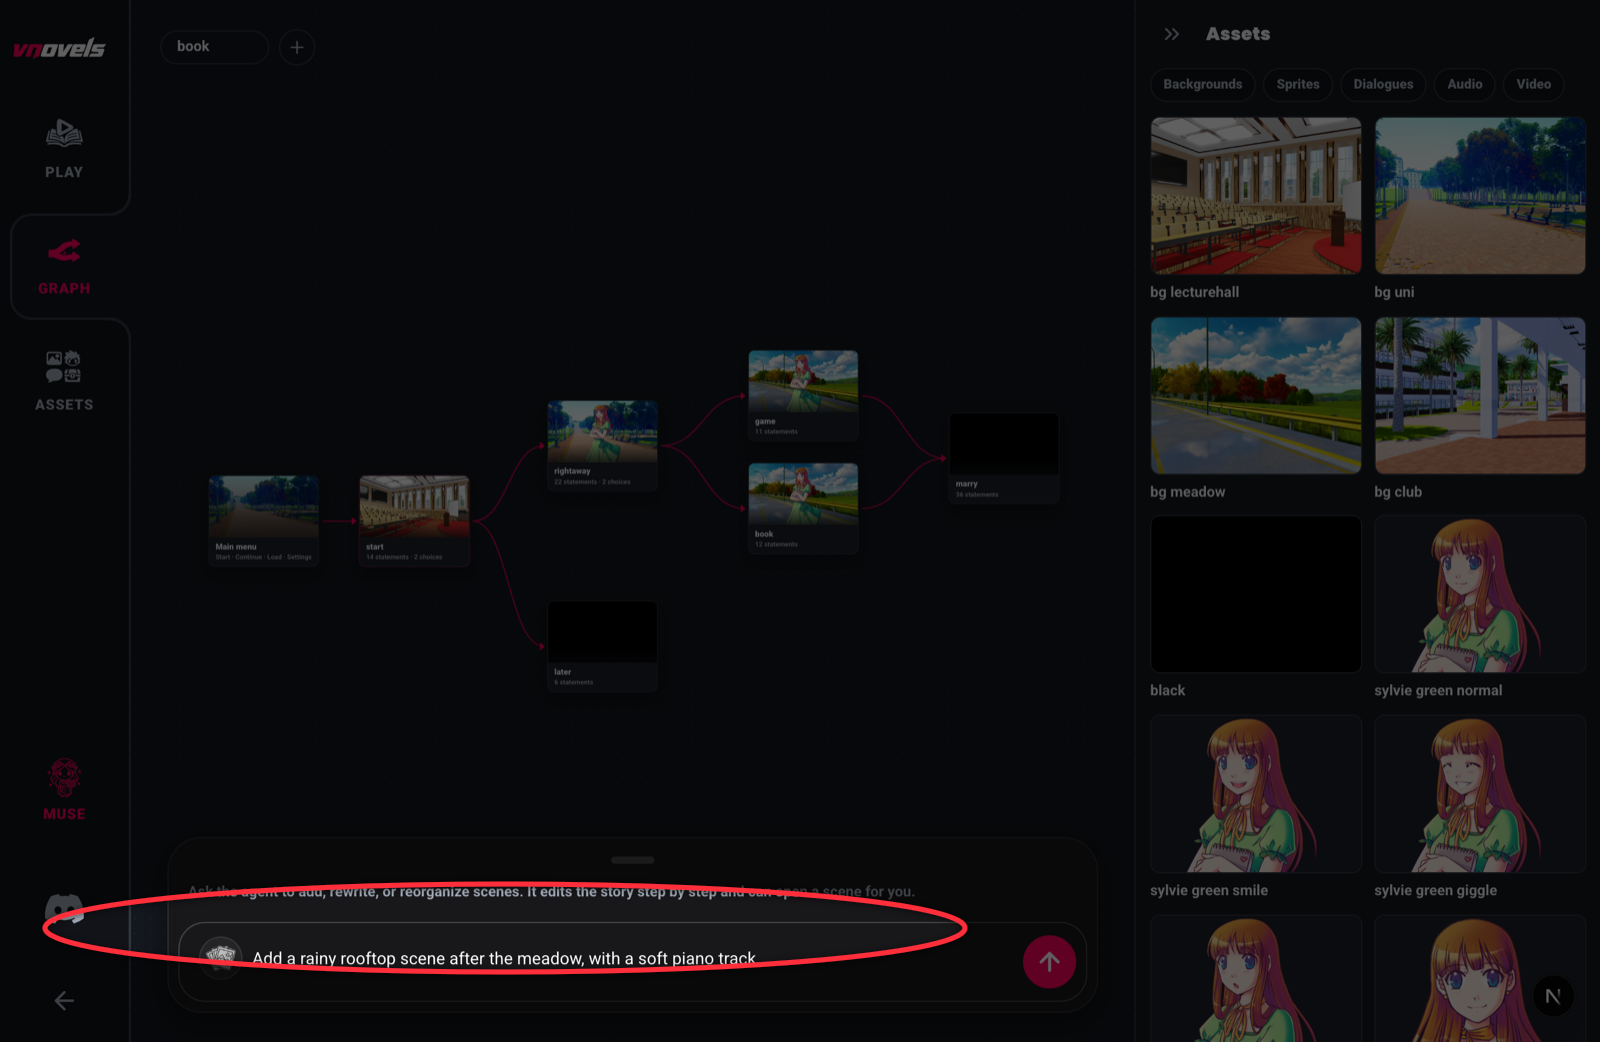
- Graph. The flowchart of your whole story. Every scene is a node and every jump or choice is a connection. Open a scene here to edit it.
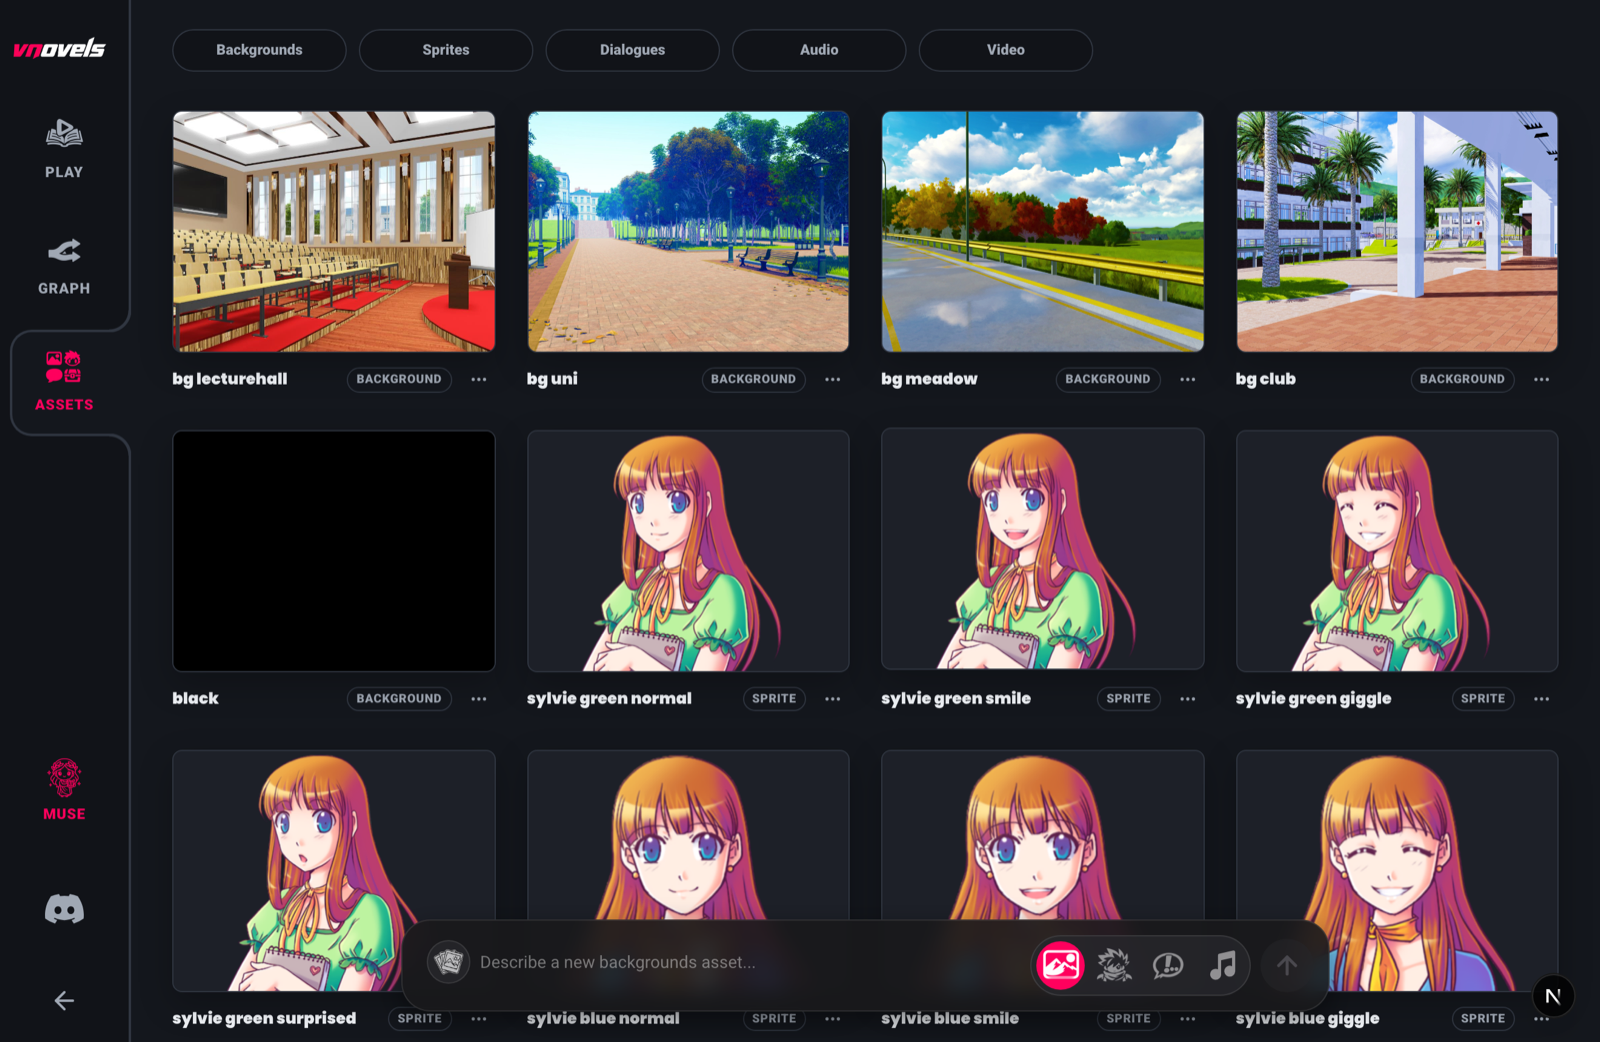
- Assets. The media library: backgrounds, character art, items, dialogue-box designs, music, and sound.
- Muse. The built-in AI assistant that writes and edits the story and generates art and audio (see Muse).
The four words this manual uses
We use a small, consistent vocabulary. If you come from another tool you may know these by other names, but they all map onto the same four ideas, and both the editor and Muse (the AI assistant) accept your words too.
- Scene. One node of the story, a single "place" in the flow. Also called: node, passage, label, card, section, page, part.
- Statement. One item inside a scene's timeline: a line of dialogue or narration, a choice, a variable change, a jump, a sound cue, a sprite change. Also called: a beat, a step, a line.
- Route. A whole path through many scenes, usually gated by the player's state (an affection score, a flag), classically one route per love interest. A branch is the fork itself; a chapter groups scenes.
- Attribute. A story variable: a number, a flag, a piece of text the story remembers. Also called: variable, flag, stat, switch, state.
Your first story
The fastest way to understand the engine is to make a few lines playable. This walkthrough builds the opening of "The Question", the classic Ren'Py demo we use throughout this manual.
Opening) holding a single starter line you replace.Behind the scenes, those statements are stored as a tiny, readable script. Here is a complete little story in the engine's grammar. You rarely write this by hand (the editor and Muse do), but it is the clearest way to show a story's shape:
define s = Character("Sylvie", color="#c8ffc8")
define m = Character("Me", color="#c8c8ff")
label "opening":
scene bg-lecturehall
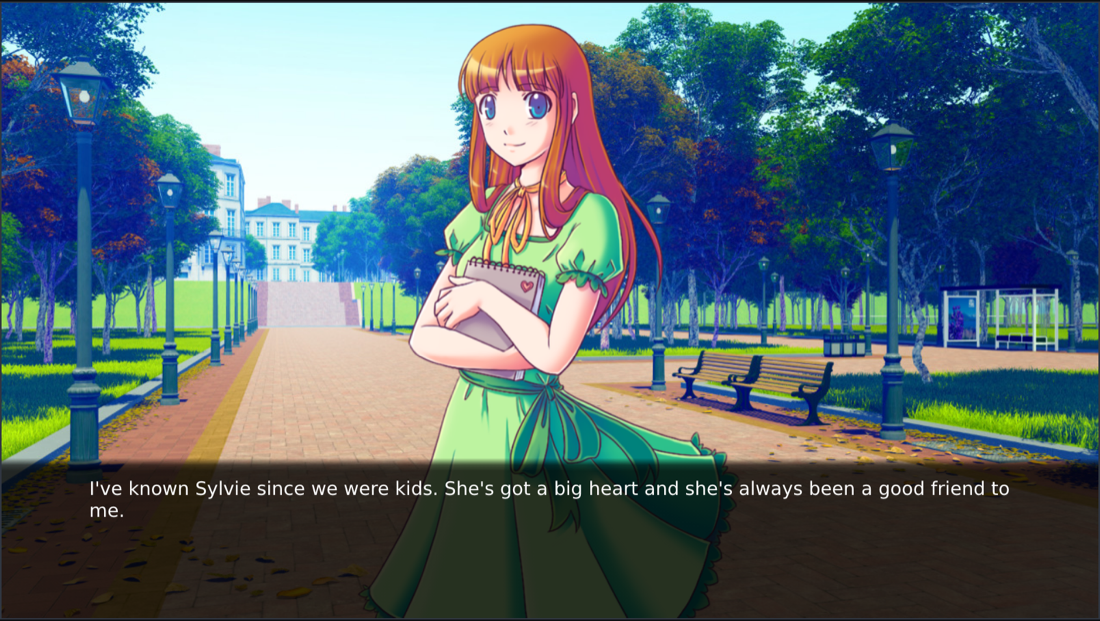
"I'll never forget that day..."
show sylvie-green-smile
s "Hi there! How was class?"
m "Good... I've been meaning to ask you something."
jump "ask_her"
label "ask_her":
m "Will you make a visual novel with me?"
s "I'd love to!"Play starts at your first scene (here opening); the editor decides which scene is the start, so naming a scene start has no special meaning. A scene that ends with no jump or choice (like ask_her) finishes the playthrough.
Writing
Scenes, the lines inside them, and the cast who speak them.
Scenes & the timeline
A scene is one node of your story. Inside it, statements play top to bottom: your dialogue, choices, sprite changes, sounds, and logic, in the order they run.
Each scene has a label, a short identifier used to jump to it. Labels are identifiers, so they cannot contain spaces; the editor normalizes any whitespace to an underscore (old_well, day-2-court).
Working with the timeline
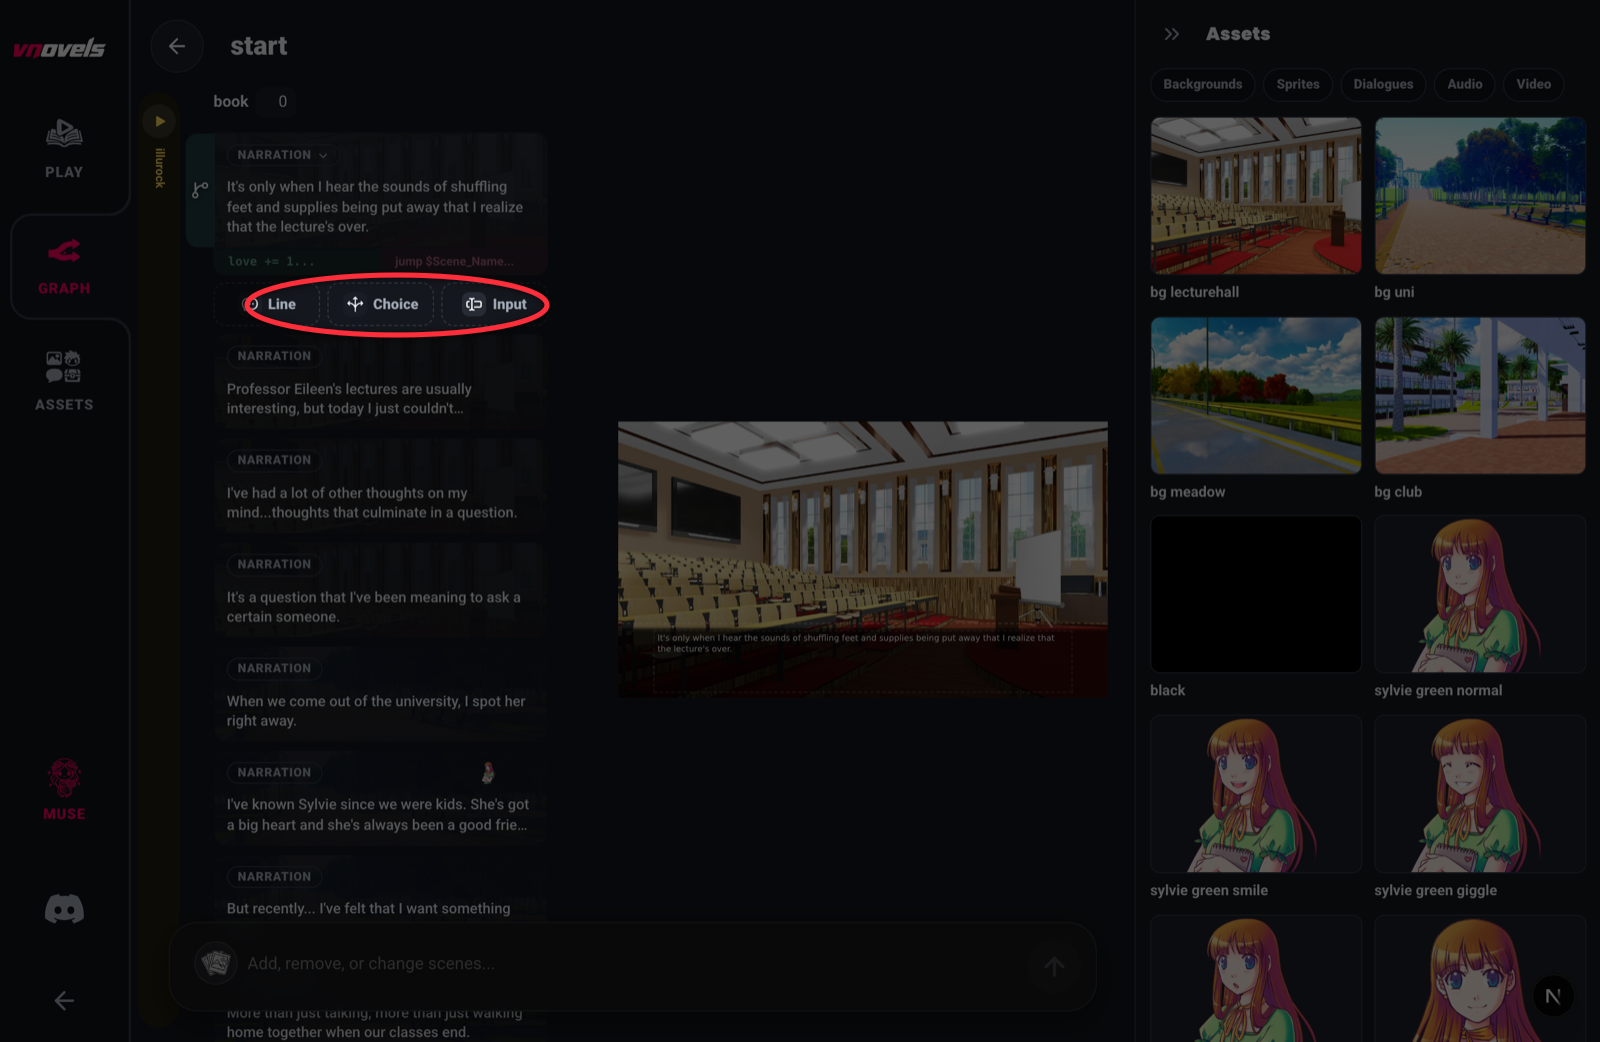
Dialogue & narration
The most common statement is a line: someone talking, or the narrator setting a scene. A line with a speaker shows a name tag; a line with no speaker is narration.
In the script grammar a line is a speaker followed by a quoted string; the speaker is the character's short variable (from a define line). Narration is a bare quoted string:
s "Hi there! How was class?"
"I'll never forget that day."
narrator s "A voice echoes from the hall."
narrator styles a narration line as a named character (for color or box binding) while still hiding the name tag. The character must be defined first, like any speaker.
Formatting text with tags
Inline tags ride inside the quotes. The text toolbar inserts the common ones (Bold, Italic, a selection color, Insert attribute, an Instant span, a Wait marker, and a Reveal-speed span); the rest you type by hand. They all render and round-trip losslessly.
{b}...{/b}bold,{i}...{/i}italic,{u}...{/u}underline,{s}...{/s}strikethrough.{color=#ff005d}...{/color}color,{size=40}...{/size}size,{font=mono}...{/font}font (typed by hand, no toolbar button).${name}inserts the value of an attribute (great after an input).{w}waits for a click;{w=1.5}mid-line pauses the reveal 1.5s then continues, and at the very end of a line auto-advances after 1.5s with no click.{nw}auto-advances immediately;{p}is a paragraph break.
s "Wait... {w}you mean {b}right now{/b}?"
s "Hello, ${name}. {color=#66d4db}Welcome back.{/color}"Characters
A character is a named speaker. Give them a name color and, optionally, their own text color and dialogue box so each voice reads distinctly.
Logic & branching
Choices, variables, and the four keywords that shape every route.
Choices & menus
A choice (a menu) is how the player steers the story. Each option can lead to another scene, change an attribute, require a condition, or carry its own art.
In the grammar, a menu is a header and one line per option:
menu:
  "Ask her right away." -> "rightaway"
  "Ask her later." -> "later"
An option line can carry, in order: per-choice art (img / hover), a show condition (if), a jump target (->), an activate sound (~), and an assignment ($):
menu:
  "Confess." if love >= 3 -> "good_end" $ confessed = 1
  "Say nothing." -> "later"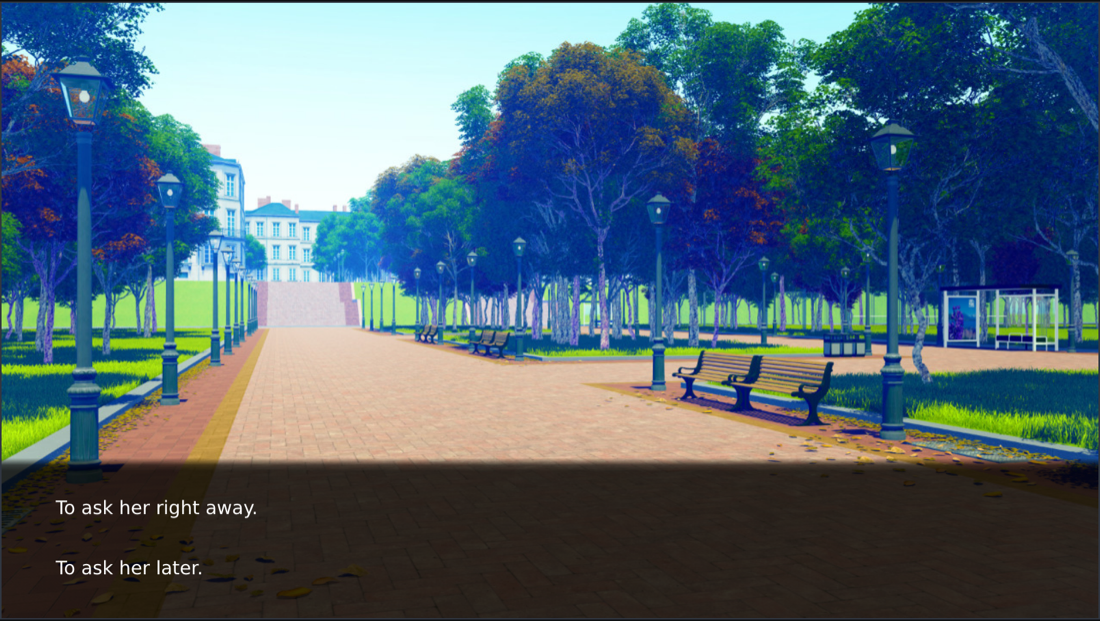
Attributes (variables)
Attributes are the story's memory: affection scores, flags, the player's name. The story reads them in conditions and changes them with set statements and choice stamps.
- An unset attribute reads as the number 0 (which is falsy), so you rarely need to initialize anything.
not seen_wellis true beforeseen_wellis ever set. - Change one with a set statement. In the script grammar a set is written with a
$prefix:$ love += 1,$ route = "moon",$ unlocked = true. - Values can be numbers, text, or true/false. Conditions accept keyword or symbol operators interchangeably (
and/&&,or/||,not/!), and a single=in a condition means equality.
Persistent attributes
Most attributes reset each playthrough. Flag one as persistent (the ∞toggle on its pill) and its value survives across playthroughs for that signed-in player: for gallery unlocks, New Game+ carryover, or "you've seen this ending" flags.
Conditions & control flow
Four keywords (if, elif, else, and jump) plus attributes give you every branch you need: gated lines, multi-statement arms, route dispatch, and loops.
Conditioned lines and jumps (the cheapest branch)
mia "You came! I knew you would." if love >= 3
mia "Oh. It's you." if love < 3
jump "true_end" if confessed = 1
A line with a failing condition is silently skipped. A conditioned jump is taken only when its condition holds. Per-line guards have no implied else, so write the exact complement yourself.
Blocks: if / elif / else
When an arm needs more than one statement (a line plus an attribute change, say), use a block:
if love >= 3:
    $ trust += 1
    s "I was hoping you'd ask."
elif love >= 1:
    s "Oh, sure, okay."
else:
    s "...maybe another time."
Keep blocks balanced (the editor renders them as a connected chain with editable condition chips). Play falls out of the taken arm to the statements after the block, so branches converge for free.
Asking the player for text: input
input name "What's your name?"
m "Nice to meet you, ${name}."inputstores the player's text in an attribute; recall it with ${name} in any later line.
Compound conditions
Join comparisons with and / or / not, and group with parentheses:
jump "true_end" if (love >= 3 and brave) or route = "moon"Loops: while
A whileblock repeats its body while a condition holds (handy for “ask until they get it right” prompts). Make sure the body stops on a player-facing line or changes the condition; a runaway loop is capped at 100,000 statements and ends the scene rather than freezing.
while answer != "rosebud":
    input answer "The password?"
"Wrong." if answer != "rosebud"Story logic patterns
Reach for the smallest construct that expresses what you want. These are the recurring shapes. Pick by the request, not by habit.
- Stat-gated reaction (one alt line per tier) → a chain of conditioned lines.
- Route dispatch (one point fans out by state) → a stack of conditioned jumps, always ending with one unconditioned jump so play never falls off the end.
- Hub-and-spoke(visit places in any order, exit when done) → a menu of options gated on "not seen yet", each spoke setting its flag and jumping back.
- Counters & thresholds(points across chapters) → increment with an option's
$clause, gate the payoff with a compound condition. - Convergence (branches share an ending) → end every branch with
jumpto one shared scene; never duplicate the shared content.
jump "moon_route" if route = "moon"
jump "sun_route" if route = "sun"
jump "common_route"Presentation
Backgrounds, characters on stage, motion, and sound.
Backgrounds & sprites
The stage has a background and any number of character sprites. You set them per statement, and you arrange them by dragging right on the stage.
Backgrounds
A backgroundstatement swaps the stage's backdrop. In the grammar it's scene followed by the background asset name:
scene bg-lecturehall
scene bg-meadow with dissolve 600
The asset name is a bare identifier (no quotes); a transition rides on a with <kind> <ms> suffix where the duration is in milliseconds.
Sprites
A show statement puts a character on stage; hide removes them. Position, zoom, mirror, and paint depth are all clauses, but you usually set them by dragging and resizing the sprite on the stage.
show sylvie-green-smile
show sylvie-green-smile at 0.3,0.5 zoom 0.9
show sylvie-green-smile behind eileen
hide sylvie
at X,Ysets the position as a fraction of the stage from 0 to 1 (0.5,0.5is centered).zoom Nsets scale;mirrorflips horizontally.zorder N/behind tagset paint depth, so a sprite can sit in front of or behind another. The editor exposes this as the selected sprite's Send behind / Bring in front buttons.
show inside an if.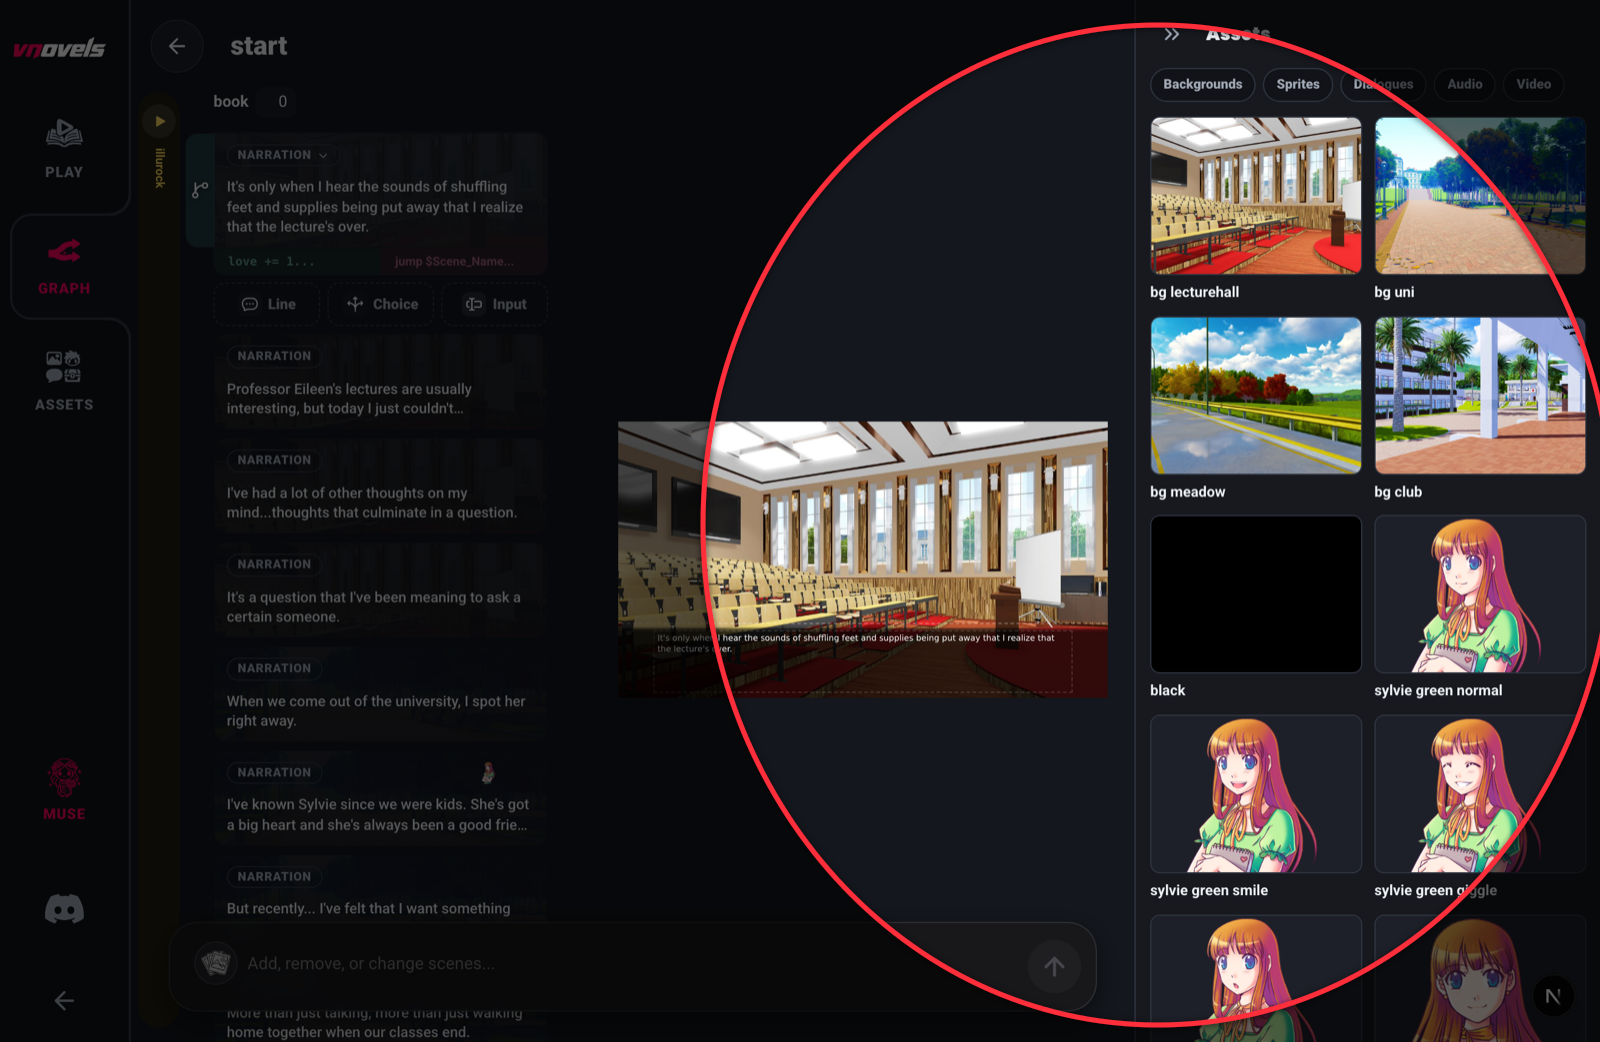
Transitions & effects
Backgrounds and sprites can arrive with motion. Transitions are per-statement, set from the stage chip: dissolves and fades for backgrounds, entrance effects and shakes for impact.
Background transitions
The background stage chip has a transition dropdown (Cut, Dissolve, Wipe, Slide, Iris, Fade) plus separate pills for the transition time, a fade color (when Fade is chosen), a filter, and a shake. In the grammar the transition is a with suffix and the time is in milliseconds:
- Dissolve: the new background crossfades in.
scene bg with dissolve 600. - Fade: the stage dips through a color and reveals the new background from it.
scene bg with fade 500 color #000000. - Shake: a one-shot whole-stage punch (
hpunchhorizontal,vpunchvertical).scene bg-club shake hpunch.
Sprite entrance effects
A showcan carry an entrance effect, set from the sprite's effect chip: fade (fade in), hop, shake, bounce, movein-left, and movein-right.
scene bg-club shake hpunch
show sylvie-green-surprised effect bounceAudio: music & sound
Music loops under the scene; sound effects fire once. Both come from audio assets and play through sound cues on the timeline.
play music "illurock" fadein=1000
play sound "door-creak"
There are two channels, chosen by the cue: music (one looping track, last cue wins) and sound (one-shot effects). Audio names are quoted; the params are key=value in milliseconds (fadein=1000). There is no stop keyword: to stop the music, add a music cue with no track in the audio-cue panel.
Theming & chrome
The look of the dialogue box, the title screen, and the play menus.
Dialogue-box themes
You can design the whole dialogue box: its fill, border, text, and the choice buttons. A theme is a reusable preset you can also override on a single line.
What you can change
- Geometry:the box's position and size on the stage (drag to move/resize) and its corner radius.
- Fill: a solid or gradient background, opacity, blur, an optional top feather (revealed by the Fade toggle), or a full box image (upload the say-window art and stretch it behind the text).
- Text: font, size, line spacing, a Center alignment toggle, and color; the dialogue asset editor adds a Bold toggle. (Paragraph gap and text outline are theme tokens Muse or an import can set, but they have no editor control yet.)
- Choice buttons: fill color and opacity, idle and hover text color, text size, weight, caption alignment, corner radius, gap, padding, columns, a shared button-image skin, and per-option art.
- Name tag: its position, background, color, and radius.
Title screen & quick menu
Your project's chrome (the title/main menu the player lands on, and the in-play quick menu for back, history, skip, auto, and save) is designed in the title-menu editor.
The title (main) menu
The quick menu
The in-play row of controls (back, history, skip, auto, save, quick save/load, preferences) is configured on the Quick tab: its actions, labels, colors, font, position, and optional per-action art. You can also hide it entirely.
Playing & tools
Test your story, navigate the graph, manage media, and write with Muse.
Playing & saving
The Play view is your story exactly as a player sees it, and the test bench you'll use most while writing. It has the full reader toolkit.
- Advance by clicking the stage or pressing Space, Enter, or the right arrow; take a choice by clicking an option.
- Back (or the left arrow) rolls the story backward; the quick menu also offers history, skip (fast-forward seen text), and auto (hands-free advance).
- Save / Load keeps multiple named slots, while Quick Save / Quick Load use one rolling slot (the latest overwrites the previous).
- Preferences control text speed, auto speed, skip options, fullscreen, and music/sound volume.
The graph view
The graph is the map of your whole story. It's the fastest way to navigate a large project, rewire branches, and spot dead ends.
- Each scene is a node; each jump or choice is a connection between nodes.
- Create a scene by double-clicking the empty canvas; open one by double-clicking its node.
- The attributes panel (top-left) adds, renames, and removes your story variables; Auto-arrange (top-right) tidies the layout. The graph stays in sync with the playable editor.
Assets & generation
The Assets view is your media library. Every asset has a type, shown as a tab; you wire it into the story from the stage, a sound cue, or a theme.
- Backgrounds: full-frame scene art, set with the
scenestatement (drag onto the stage). - Sprites(characters & items): cut-out art shown with
show. Generated characters are auto-background-removed so they composite cleanly on any background. - Dialogue boxes: reusable say-window designs (see Dialogue-box themes).
- Audio: music tracks and sound effects, played by a sound cue.
- Video: uploaded clips for cutscene or looping backgrounds.
Editing an image never overwrites it: it makes a new variant and keeps the original, so an asset is really a small stack of versions you can pick between.
Muse: the AI assistant
Muse is a writing and art collaborator built into the editor. Tell her what you want (a new branch, a different ending, a rainy-alley background) and she edits the story directly.
Muse can:
- Write and edit the story: add, rewrite, move, or delete scenes and statements; build choices and branches; set jumps; create characters and attributes.
- Make art and audio: generate new images or sound, and edit an existing image into a variant.
- Style and configure: restyle the dialogue box and set up the title screen.
- Drive the editor: open a scene, switch views, or start a preview, so you can watch her work.
Muse is context-aware: she knows which scene you have open and which asset you have selected, so "add a line here" or "make it brighter" just works on the thing you're looking at. She speaks your vocabulary too. Call a scene a node or a passage, an attribute a flag or a stat, and she maps it.
Reference
Every statement and clause, and a map from Ren'Py terms to ours.
Script grammar reference
A quick reference to the statement and clause grammar. You rarely type this (the editor and Muse write it), but it is the precise, loss-free shape of a story, and it round-trips every field.
Statements
| Statement | Syntax | Meaning |
|---|---|---|
| Character | define s = Character("Sylvie", color="#hex") | Declares a speaker; s is its short var. |
| Scene label | label "name": | Opens a scene; its statements follow, indented. |
| Dialogue | s "text" | A defined character var speaks; shows their name tag. |
| Narration | "text" | A bare quoted string: the narrator, no name tag. |
| Narrator (styled) | narrator s "text" | Narration styled as a (defined) character; tag still hidden. |
| Background | scene bg-name [clauses] | Changes the stage background. Name is a bare identifier. |
| Show sprite | show sprite-name [clauses] | Puts a character/image on stage (bare name). |
| Hide sprite | hide tag | Removes a shown sprite (bare tag). |
| Audio | play music|sound "name" [intro "name"] [fadein=N] [fadeout=N] [volume=N] | Plays a track or effect. Params are key=value (ms; volume 0 to 1). No stop keyword. |
| Set | $ var = value (also +=, -=) | Changes an attribute (the $ prefix). |
| Branch block | if cond: / elif cond: / else: | Conditional arms; the block closes by dedenting (no endif keyword). |
| Loop | while cond: | Repeats its body while the condition holds; closes by dedent. |
| Jump | jump "scene" [if cond] | Goes to another scene (quoted label), optionally if the condition holds. |
| Input | input var "prompt" [ok "label"] [if cond] | Asks the player for text, stored in an attribute. |
| Menu | menu [if cond] [timeout N [default I]]: | A choice; options follow, indented, one per line. |
| Menu option | "Caption" [img "a"] [hover "a"] [if cond] -> "scene" [~ "sound"] [$ assign] | One option. The -> "scene" is required (the target may be empty for silent routing). |
Background clauses (after scene)
| Clause | Meaning |
|---|---|
with none|dissolve|wipe|slide|iris|fade [ms] | Transition and its duration in milliseconds (default 600). fade dips through a color. |
color #rrggbb | The fade color (default black). |
filter "<css>" | A persistent CSS filter on the background (e.g. blur(4px)). |
overlay "asset" | Draws an overlay image above the background. |
shake hpunch|vpunch | A one-shot whole-stage punch. |
video "name" loop|cutscene | Plays a video on the stage (always the last clause). |
Show clauses (after show)
| Clause | Meaning |
|---|---|
as tag | Names this sprite instance (for later hide / layering). |
at X,Y · zoom N · mirror | Position as a 0 to 1 fraction (0.5,0.5 = center), scale, horizontal flip. |
natural · filter "<css>" | Native-size mode; a persistent CSS filter on the sprite. |
effect fade|hop|shake|bounce|movein-left|movein-right | An entrance animation (fade = fade in). |
zorder N · behind tag | Paint depth: higher is in front; behind draws under a named tag. |
Conditions & inline tags
| Token | Meaning |
|---|---|
and/&& · or/|| · not/! | Boolean operators (keyword or symbol); group with parentheses. |
= / == · != · >= <= > < | Comparisons. = and == are both equality. |
{b} {i} {u} {s} {color=#hex} {size=N} {font=NAME} | Inline text styling inside quotes. |
{w} {w=1.5} {nw} {p} {cps=N} ${var} | Click-wait, timed wait, no-wait, paragraph break, reveal speed, attribute interpolation. |
nobox · ~box {...} | Say-line suffixes: hide the box for the beat; carry a per-line box-theme override (opaque JSON). |
Coming from Ren'Py
If you know Ren'Py, most concepts map directly. The biggest gotcha is the word "scene": here it is a story node, not a background change.
Our script grammar is Ren'Py-flavored, so most lines look nearly identical. The main differences: scene labels are quoted (label "start":) and the word scene here means a graph node, while a background change is the scene statement.
| Ren'Py | VNovels | Note |
|---|---|---|
label start: | label "start": | A scene (a graph node); the label is quoted. |
scene bg room | scene bg-room | A background change, not a graph node. |
show eileen happy | show eileen-happy | A sprite on stage (bare name). |
e "Hi!" | e "Hi!" | Same: a defined speaker var, then a quoted string. |
$ love += 1 | $ love += 1 | Same: a $ set line. |
persistent.seen | A persistent attribute | Flag the attribute persistent (∞). |
with fade / window hide | with fade 500 color #hex / nobox | Fade-through-color (ms); hide the box for a beat. |